The pipe is a 1970-80's a
bent saddle Guildhall 215 by
Comoy's (if Comoy's shapes and number correspond to Guildhall's ?)
Actually, except for the stem, the pipe is in fairly good shape.
This post is not really intended as a "how to", but rather what I did. There are DIYS on the internet, search for
estate pipe restoration etc.. REMEMBER, different pipes are made from different materials; and things I do to this pipe might damage yours. So read at your own risk!! All these pictures can be enlarged by clicking on them a few times. Sorry the images are dark, they looked good on my laptop....
 |
| There is a small dent under the rim, but we are not going to worry about that. |
 |
| Note the green stem. |
 |
| Close up showing tar on the bowl's rim. |
 |
| The inside: that might be a cobweb? |
 |
| Makers stamp and Guildhall three bars. |
Bleaching the Stem
The (
vulcanite/ebonite/hard rubber) stem is removed and placed it in a solution of 50:50 bleach/water. Besides not wanting a green pipe stem, the greenish color (oxidized sulfur) tastes VERY BAD. Olive oil, or something like that, may mask its presence slightly, but unless removed, the stem will taste of sulfur which is used to vulcanize the rubber. The bleach removes much of the oxidized portions and does not seem to attack the good rubber. Again, not all stems are made of ebonite and I cannot vouch for what bleach might do to other stems (like with many cleaning agents "test on an inconspicuous area first". People recommend protecting any logos present on the stem with Vaseline as a barrier to the bleach. I did not do this on the Guildhall, because the logo is actually metal (the bleach could hurt the metal too, but I didn't worry about that).
 |
| Sitting in bleach, note the bubbles! |
While the stem is bleaching I worked on removing tar from the bowl's rim.
 |
I used q-tips moistened with water. As you can see the q-tips removed a lot of the tar. I found that stubborn areas could be attacked using the "shoulder" of the q-tip (where there is little cotton), allowing for more vigorous scrubbing. |
 |
| Most of the tar came off the upper rim, I did not try cleaning the bevel, figuring it was going to get all gummed up again anyway (it's a pipe). |
The next step was cleaning out the shank, mortis, and draught hole/tube. Q-tips and bristled pipe cleaners moistened with alcohol slowly remove much of the residues.... This pipe has a "sump", I assume to collect moisture, this area needed the most attention. I will install a small sump pump in there before smoking it.
 |
| Using a pair of X-ray glasses held over the camera lens, I was able to photograph the inside of the pipe to illustrate the "sump" and draught channel. When I drew this I wasn't looking at the pipe, but this is close. |
 |
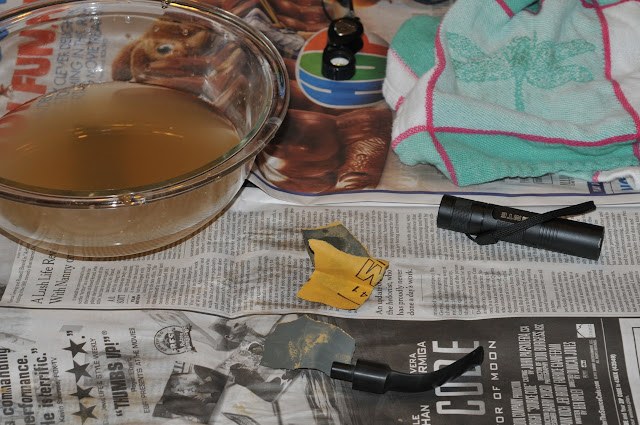
As you can see I went though a lot of q-tips. The flashlight is great for illuminating the interior of the mortise and shank to check the cleaning progress. Pipe cleaners doubled over were effective at scrubbing the walls of the shank and sump. Single cleaners were used for the draught tube. The scissors were used to remove gunked up ends of the pipe cleaners to expose a fresh part of the cleaner (waste not want not). |
 |
| More bubbles in the bleach. |
 |
| The stem removed from the bleach and thoroughly rinsed. Note the dull surface, but much of the green is gone. |
 |
| After the bleach, some discolored areas remain; these will be mechanically removed later. |
After the bleach treatment, the sanding begins. I started with 1500 grit wet/dry sandpaper. A coarser grit might have been more effective, but I didn't have any, and was too lazy to go out and get more... If I intended to remove all the tooth marks, it would have been worth the trip. Next time I will try M
icromesh papers recommended by
Mister Moo. I would be careful using anything coarser than 1500 for the stem abutting the briar, if too much material, or the surface is beveled, a noticeable gap will appear between the stem and pipe (I've done this). Not much to the sanding, I just tear off bits of sandpaper, wet them in a bowl of water and carefully sand the surface dipping the stem and paper in the water frequently. Sandpaper, especially finer grits, dulls quickly so fresh sheets will speed things along. Contours near the shank and the lip are the hardest to get to with the paper.
 |
| To check the progress I rinse the stem in clean water and dry it. While wet, the stem looks shinny no matter what's going on. Before moving on to a finer grit make sure all areas of the stem have an even appearance. In this case, I found some areas that needed more work, especially near the lip and the shoulder where the flattened part of the stem meets the round part, so I went back to the 1500 grit for a 2nd round. |
 |
| This is still the 1500 grit, note that the sandpaper cannot get into the tooth marks. With heaver paper I could have just sanded them out; but I figure that I will just add new marks anyway,and there is no sense in thinning (weakening) the stem too much. The final polishing will make the divots less noticeable anyway. |
I have gone right from the 1500 grit paper to Brebbia pipe stem polish in the past, but I thought I would continue with some finner paper in this case.
After the 1500 grit I went on to some 2500 paper.
 |
Result of the finer grit paper. Things are starting to look good. The stem would be usable at this point, and with a coating of olive oil (some people use it to polish and protect their stems), it would look great. |
 |
| The shoulder is not perfect, but final polishing will take care of that. |
After the finer grit paper comes the final polish (abrasive, not just a coating). Toothpaste and other things seem to work ok, but I have had very good luck with
Brebbia Pipe Stem Polish. The small tube pictured below has lasted through a dozen pipe stems and is not empty yet. I use only small amounts on a soft cloth for the large areas, and q-tips for tight or recessed areas like the lip or tooth marks.
 |
| Stem polishing stuff. Note the black residue on the while cloth, this is from the metal logo on the stem. |
 |
| The final results! |
 |
| You can see a few tooth marks under the lip, but it still looks good to me. |
While polishing the stem, the bowl was getting the so called "salt and alcohol treatment". Just google that and you will get lots of "how-tos". I used cotton instead of salt, but have no real preference and have used both methods.


With all that done, the pipe is reassembled. The briar was cleaned with an alcohol soaked paper towel. I have always been told (ok read) that alcohol will destroy the finish. But, I also discovered that alcohol seems to have little effect on real carnauba wax... So your results may vary, different pipes may react differently (I am not suggesting that your pipes finish will not be destroyed). The alcohol removed some dirt, and left a dull surface. But, that dull surface was brought back up when buffed with a soft cloth (the t-shirt I was wearing). My GUESS, is that skin oils and what not build up on the pipe and give it a sheen over time, when removed the surface looks dull, buffing at this point can therefor can brighten up the carnauba wax that was underneath the gunk.
 |
| Results of the hand buffing. |
At this point the pipe looked good and was really ready to go, but I just got a
bar of carnauba wax
and have a buffing wheel so I gave it a final wax. Its hard to tell from the photo, but the wax really improved the shine on the bowl (I only waxed the stem near the briar). That being said, is also looked good with just a hand buffing so people without buffers need not despair.
 |
| All done! |


Good job, the pipe came out looking great. You obviously have a lot more patience than I do but the results are beautiful.
ReplyDeleteLook like a brand new pipe now. I really like that grain.
ReplyDeleteI used to smoke pipes, 25 years ago, but switched to cigars at some point. My son exhibited interest in my pipes, and I've thought about rekindling my hobby, but everytime I put the old pipes in my mouth, they just tasted too nasty to light up. After reading this I now understand what happened. What's funny is that my bits are (now) cream colored, like yellowed ivory. My wife, who remembers everything, came in and I asked her, "Hon, were these pipe stems black when I smoked them in school?" Wide-eyed, she responded, "You're right! What happened?"
ReplyDeleteI guess now we know. Thank you for a great post and for giving me a game plan. You may be responsible for pulling me back to pipe smoking!
Good lord you do nice work. You put me to shame, but I'm cribbing some of your techniques.
ReplyDeleteSA
This is the best, well described DIY on cleaning and polishing a "previously used" pipe. I have about 12 pipes that I smoked 30 years ago and am now getting back into smoking pipes. Thanks for sharing.
ReplyDeleteI dont know how to separate the stem from the bowl. Help!
ReplyDeleteThis is just the information I am finding everywhere. Thanks for your blog, I just subscribe your blog. This is a nice blog.. bubblers
ReplyDeleteThanks so much David. Thanks to you I picked up the restoration of a heavily oxidised pipe stem. Got a 'new' pipe last week and I might have been a bit deceived by the nice polish of the vulcanite stem. Pipe was made of a piece of 40 year old briar and fitted with a Butz Choquin pipe stem and might have been behind the counter for some time. As soon as I smoked the pipe it discoloured and exposure to hot water confirmed the stem was heavily oxidised showing the same green colour as in your pictures. Did the bleach treatment first and that has really worked well. Now off to get some fine grit sand paper and waiting for the delivery man to get me some Savinelli Polish (Brebbia not available in the UK) to get on with the next phase of restoring the pipe stem. Hopefully I get a similar result to yours.
ReplyDeleteSmall part of people like using pipe for smoke,I am one of them,like pipe so much.
ReplyDeleteTaylor Gang gravity bong, created in collaboration with Wiz Khalifa, now offers the opportunity to own the Wiz Khalifa gravity bong at an affordable price.
ReplyDelete